This is a step-by-step guide to learning to host a Django Website on AWS EC2 securely within 5 minutes. So without further ado, let’s begin.
- Creating a Django URL Shortener project
- Launching an EC2 Instance on AWS
- Copy Django Project to EC2
- Creating Python Virtual Environment
- Activate the Python Virtual Environment
- Revisit the directory structure
- Installing Python 3 Development Packages on EC2
- Installing Django and other dependent packages
- Updating the file permission & ownership
- Switch to Root User and Reload the Python Virtual Environment
- Add mod-wsgi.server in our Django project's settings.py
- ADD CSRF_TRUSTED_ORIGINS in settings.py
- Add Domain Name in the ALLOWED_HOSTS
- Configuring Apache HTTPD using "runmodwsgi" command
- Running the project
- Installing Nginx
- Configure Nginx
- Restart Nginx to load the Nginx Configuration File
- Updating DNS Record in your DNS Registrar
Creating a Django URL Shortener project
I have created a sample URL Shortener project in Django. You can get the steps to create the URL Shortener project here or you can use your own sample Django project.
Launching an EC2 Instance on AWS
I will launch an EC2 instance in the “us-east-1” region. Here is the direct link to jump to launch an EC2 instance.
Name: Give a suitable name to the EC2 Instance. I am naming it “web-hosting”
Application and OS Images (Amazon Machine Image): Select “Amazon Linux 2023 AMI” or any other suitable AMI based on your liking.
Architecture: Let’s keep it to “64-bit (x86).
Instance type: t2.micro (this is eligible for Free tier)
Key pair (login): Create a new key pair or select the existing key pair.
Network settings:
- Select Allow SSH traffic from anywhere.
- Select Allow HTTPS traffic from the internet.
- Select Allow HTTP traffic from the internet
Storage: I am creating this instance only for the demo purpose, so I am keeping it at 8GB, but please feel free to change the storage size to what’s suitable for your website.
That’s it, we are pretty much done with the configuration and can now hit “Launch Instance”. AWS will take a few seconds before our instances show in the running state.
Copy Django Project to EC2
Let’s copy our URL shortener project to the home directory of the current user (/home/ec2-user). You can use tools like WinSCP to copy the files from your local machine to EC2.
Creating Python Virtual Environment
It is always best to create a virtual environment so that we can install all the required libraries for our project in that virtual environment. To create a virtual environment we can use below command:
python3 -m venv ~/python-venvExplanation of the command:
This command creates a virtual environment for Python using the built-in venv module. Let’s break it down:
python3: This specifies the Python interpreter to be used for creating the virtual environment. In this case, it explicitly specifies Python 3. If you have multiple Python versions installed on your system, usingpython3ensures that the virtual environment is created with Python 3.-m venv: This part of the command invokes thevenvmodule as a script using the-mflag. Thevenvmodule is a standard Python module used for creating lightweight virtual environments.python-venv: This is the name given to the directory that will contain the virtual environment. You can replacepython-venvit with any name you prefer. This directory will contain all the necessary files and directories to isolate the Python environment.
When you execute this command, it creates a directory named python-venv (or whatever name you provided) in the current working directory. Inside this directory, it sets up a minimal Python environment with its copy of the Python interpreter, standard library, and other necessary files. This allows you to install Python packages independently of those installed globally on your system, providing isolation and avoiding conflicts between different projects’ dependencies.
Activate the Python Virtual Environment
Let’s activate the virtual environment which we have created. Follow these commands to activate the virtual environment.
source ~/python-venv/bin/activateLater on, if you want to deactivate the current python’s virtual environment, you can simply use “deactivate” command.
Revisit the directory structure
Just to ensure we are on the same page. Here is what my current directory structure looks like.

Installing Python 3 Development Packages on EC2
We will need to install python3-devel, which is required to compile and install “mod-wsgi” later on in this article.
sudo yum install -y python3-develInstalling HTTPD Web Server on EC2 Amazon Linux
Now, we will install “httpd” web server. Which will be used as a web server for our Django application. Use the below commands to install and enable the “httpd” web server.
sudo yum install -y httpd
sudo yum install -y httpd-devel

sudo systemctl enable httpd
Installing mod-wsgi
Let’s install “mod-wsgi“. We can do that with pip command.
pip install mod-wsgiInstalling Django and other dependent packages
Let’s install Django and dependent packages. Add Django and all other packages which is required for your Django project in the requirements.txt file. You can install them by using “pip install -r full-path-to-your-requirements.txt”
pip install -r requirements.txtUpdating the file permission & ownership
We will need to keep the ownership of our Django project to apache user so that apache has the read and write access on our Django project. Please use below commands to change the ownership and permissions.
sudo chmod 755 /home/ec2-user
sudo chown -R apache:apache ~/url_shortener_proj
Switch to Root User and Reload the Python Virtual Environment
sudo su -
cd /home/ec2-user/
source python-venv/bin/activate
Add mod-wsgi.server in our Django project’s settings.py
We need to add “mod-wsgi.server” in the Django project’s INSTALLED_APPS section, in the settings.py file.
# Application definition

INSTALLED_APPS = [
    'django.contrib.admin',
    'django.contrib.auth',
    'django.contrib.contenttypes',
    'django.contrib.sessions',
    'django.contrib.messages',
    'django.contrib.staticfiles',
    'url_shortener',
    'mod_wsgi.server', # Added mod_wsgi.server in the INSTALLED_APPS
]
ADD CSRF_TRUSTED_ORIGINS in settings.py
# In your settings.py file

CSRF_TRUSTED_ORIGINS = [
    'https://url-shortener.futureaitools.online',
    # Add other trusted origins if needed
]
Add Domain Name in the ALLOWED_HOSTS
In your project’s settings.py file, you will also need to add the domain name or subdomain name on which you want to access the website in the ALLOWED_HOSTS. If this is not done, Django will reject any requests coming on the domain name.
ALLOWED_HOSTS = ['url-shortener.futureaitools.online']Configuring Apache HTTPD using “runmodwsgi” command
We can now configure Apache HTTPD to serve the web requests. We will need to switch to root user before running it, to avoid any permission issues. Here are the commands to do that.
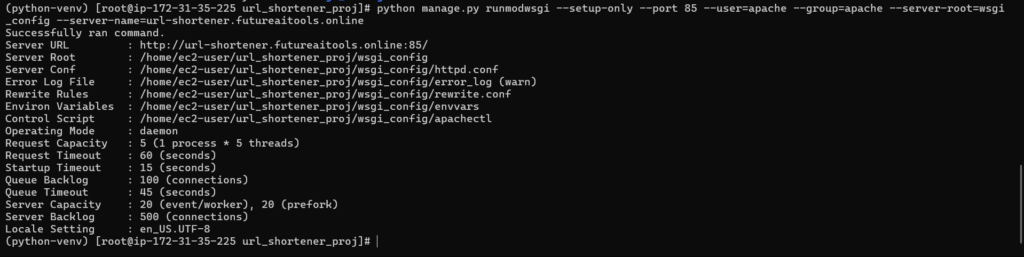
cd url_shortener_projpython manage.py runmodwsgi --setup-only --port 85 --user=apache --group=apache --server-root=wsgi_config --server-name=url-shortener.futureaitools.onlineExplanation:
python manage.py runmodwsgi: This command is provided by themod_wsgipackage and is used to manage and run Django applications withmod_wsgi.--setup-only: This option indicates that the command should only generate configuration files and setup information formod_wsgi, without actually starting the server. It’s useful for preparing the environment or checking the configuration before running the server.--port 85: This option specifies the port number on which the server should listen. In this case, the server will listen on port 85.--user=apacheand--group=apache: These options specify the user and group under which the server process should run. In this case, the server will run as theapacheuser and group. It’s important to specify appropriate user and group settings for security reasons.--server-root=wsgi_config: This option specifies the directory where themod_wsgiconfiguration files should be generated. In this case, the directory is namedwsgi_config.--server-name=url-shortener.futureaitools.online: This option specifies the server name or domain name associated with the Django application. It’s used bymod_wsgito configure the virtual host settings.
Note
Please do not forget to change the values as per your requirement. For example, I want to access my website over https://url-shortener.futureaitools.online, you will need to change it as per your domain name.
Expected output:
Running the project
Now we can use, apachectl file created under “wsgi_config” directory.
./wsgi_config/apachectl startInstalling Nginx
Let’s install and enable Nginx using the following command. At this point we don’t need to start Nginx as we need to add some nginx configuration later on.
sudo yum install -y nginx
sudo systemctl enable nginx
sudo systemctl status nginx
Configure Nginx
Let’s create an Nginx configuration to listen to all the requests received on https://url-shortener.futureaitools.online and pass it to our Django web application running in the backend.
Create a new file called “url-shortener.conf” in the following directory “/etc/nginx/conf.d/” and paste the below content.
server {
    listen 443 ssl;
    server_name url-shortener.futureaitools.online;

    ssl_certificate /etc/nginx/conf.d/<path-to-the-domain-certificate>;
    ssl_certificate_key /etc/nginx/conf.d/<path-to-the-domain-certificate-key>;

    access_log /var/log/nginx/url_shortener_access.log;
    error_log /var/log/nginx/url_shortener_error.log;

    location / {
        proxy_pass http://127.0.0.1:85;
        proxy_set_header Host $host;
        proxy_set_header X-Real-IP $remote_addr;
        proxy_set_header X-Forwarded-For $proxy_add_x_forwarded_for;
        proxy_set_header X-Forwarded-Proto $scheme;
    }

}
Restart Nginx to load the Nginx Configuration File
Let’s test our Nginx configuration and if we do not see any error then we can continue to restart Nginx services. Here are the commands to do it.
# Command to test nginx configuration
nginx -t
# Restart Nginx
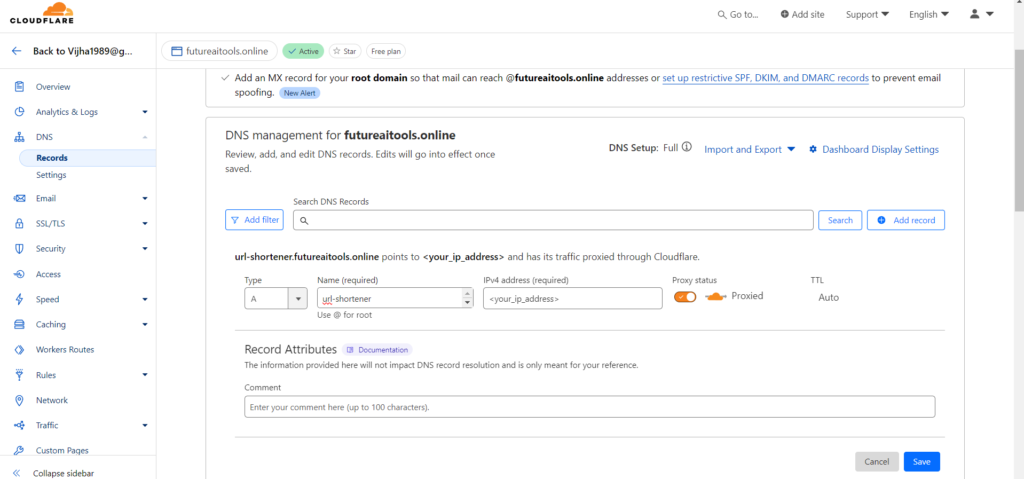
sudo systemctl restart nginxUpdating DNS Record in your DNS Registrar
Now our last step is to update the DNS Record. I am using Cloudflare, but the steps are pretty much the same if you are using any other registrar like Hostinger or Go-Daddy.
Go To DNS Management->Add Record -> Record type should be “A” , and it’s value should be the public IP address of our EC2 Instance. Save it and we are done !